Sunday 20 May 2012

The Grand Plan

Following on from a hard day's navvying then I thought it was time to share the grand plan, and that "Houston we have a problem" moment....  See the two maps from Railmodeller software.

Model railways often have a bit of give and take on curves etc because the track is put together with fishplates and it moves etc.  Well, its a good job that I'm not surveying this for real.

The challenge now is to tweak this to include R3 curves (possibly) - the almost "must have" minimum circuit to avoid any big locos having problems, the buildings (platforms and stations) that I have, and to include enough operating challenges and passing loops to make it actually fun to use.

Concept sketch

What Railmodeller tells me I've got if all track is aligned perfectly. 

What I have effectively got - there is an expandable track to ensure it joins, but I haven't understood how to achieve that yet in the software. 

Bottom left corner if I go to LGB R3.  Inner curve is PIKO radius 3 (920 mm radius), Outer curve is LGB R 3 (1195 mm radius)

Top right corner if I go to LGB R3.  Inner curve is PIKO radius 3 (920 mm radius), Outer curve is LGB R 3 (1195 mm radius)

A hard day's navvying - fine detail

I promised more on the fruits of the May bank holiday and here they are.  There's some lessons learned as well.

Track supports - LGB 50612 / 50613 and 50614.  Clip together plastic track supports.   After the first day's running with the grandchildren from next door then there was the realisation that the garden was very not level, and that bits of cardboard stuck under the track weren't really a solution.  I knew that these existed but not especially cheap but surprisingly some came up on ebay or from one of the dealers, and then I tracked more cheap ones down to a shop that was heaving a clearance (I suspect getting rid of the last of its LGB stuff that had been lying around for years).  With the ability to clip them together then they are adjustable and just the sort of thing whilst I'm planning.

Here's a view of the top right (see later post with map) curve showing the LGB supports in action Add caption
Here's the top left, coming out of the flowerbed - again showing the supports.  
Here's the far side passing loops - not really big enough to take much in the way of trains but again part of planning. 


New recruit since Christmas.  I hadn't planned on getting one quite so soon, but the offer of one came at at reduced price so I took it.  I've had it chipped with the Massoth bus sound card.  
I was a bit concerned about overhangs on the route though.  The Bus has quite a pronounced verhang and there's a couple of 45 cm long coaches (pictures yet to come) that are newly acquired and which might pose problems.  What I hadn't envisaged was another problem that came up on the first circuit.  This was catching on a wooden bridge (Ebay purchase) - the ladders on the side of the bus catch the sides of bridge.  Reminds me of being a student when the bus drivers used to fold their wing mirrors in to get through the Westgate at Canterbury.   For comparison I have photographed it on the LGB Plastic girder bridge - which does have enough clearance.  

On the wooden bridge.  


On the LGB bridge.  
Front view on the wooden bridge - ladder scraping sides

Front view on the LGB bridge.


So, another lesson learned about buying stuff and using it.

Saturday 19 May 2012

A hard day's navvying: First loop

The first bank holiday in May saw me put the first loop around the garden down.  I'd also promised Ann I'd put smoke fluid into one of the locos.  My back was much, much better although Ann did lots of the actual track joining after I just put it down on the ground.

The plastic track joiners came in very useful during this exercise, as did the packs of track supports that I bought as we could vary the height to ensure a reasonable level track.   Achieved a simple loop with a couple of passing loops on the far side near the fence, and some sidings this side.  The flowerbed on the  right proved to be higher than I thought, so track coming off it couldn't go straight onto the decking boards which are up on bricks.  Likewise, the far end of the garden - which I knew was raised and rolling is on a par with the flowerbed.

Saturday - a hard day's work 

Chief finance office inspects the track. 

Wisp of smoke just about visible. 
Front view with more wisp of smoke.  
Finally - the video of the whole thing:

Curves in the Sun (Actually February 2012)

This was something I did back in February - when it was sunny and dry unlike the days we seem to have had for the last umpteen months.

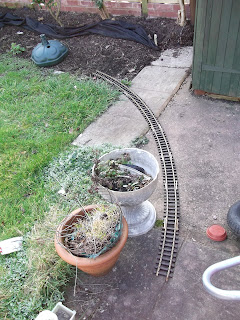
The relevence of this will come out in a later post as I update the blog. Once again, it proves that nothing quite beats laying bits of track out on the real estate.    Having made the decision that I was going to go around the edge of the lawn, then I needed to kick around ideas of fitting what I had, with what land there is on the grown.  Following photos show the results.

I think this was alternating curve and straight to see what wide really meant.  Takes up too much space and not enough curvature  to come out on the back.  


 The Yucca below does get in the way somewhat.  As later planning will show, ultimately I think it is going to have to come out.   Ann's Rosemary - the brown woody thing meanwhile, now seems to have vanished.